Crafting Ocean Magic: A Deep Dive into the Mermaid Treasure Bag SVG
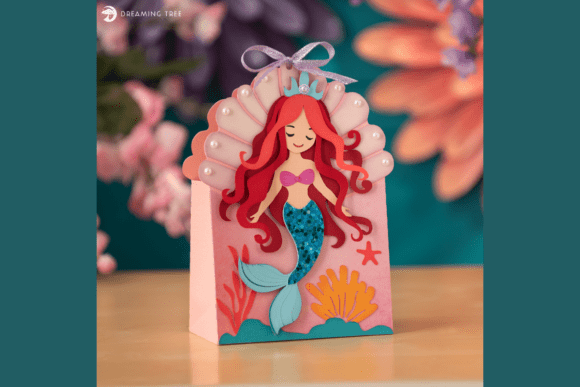
There is a distinct kind of magic that happens when digital design meets physical craftsmanship. For crafters who specialize in paper engineering and themed party decor, finding a design that balances whimsy with structural integrity can be a challenge. Enter the Mermaid Treasure Bag SVG, a project that transforms flat sheets of cardstock into a three-dimensional vessel reminiscent of a mermaid’s trove. This isn't just a simple envelope; it is an ocean-inspired 3D bag designed to hold small gifts, party favors, or serve as a standalone piece of thematic décor.
The appeal of this specific design lies in its ability to bring fantasy to life through graceful curves and shimmering details. Whether you are preparing for a child’s birthday, a bridal shower with an underwater theme, or simply looking to expand your portfolio of complex paper crafts, understanding the nuances of this file can elevate your final product from standard to spectacular.
Understanding the Design Architecture
Before diving into the cutting mat, it is essential to appreciate what makes the Mermaid Treasure Bag SVG unique. Unlike basic box templates, this design relies on layered complexity to create depth. The "treasure" aspect is not merely decorative; it is structural. The bag features a rounded, pouch-like silhouette that mimics the shape of a drawstring sack filled with sea glass and pearls.
The file is optimized for standard 12″×12″ cutting mats, ensuring compatibility with most popular cutting machines such as Cricut, Silhouette, and Brother ScanNCut. However, the true value lies in the precision of the cut lines and score lines embedded within the SVG data. These guides ensure that when you fold the paper, the curves align perfectly, creating a seamless 3D effect without the need for excessive trial and error.
When you purchase this design, you receive the SVG format exclusively, delivered in a ZIP file. Inside, you will also find a PDF legend. This legend is crucial for color coordination. Because the bag involves multiple layers—often including a base, decorative overlays, and handle attachments—the PDF helps you map out which color corresponds to which layer before you make your first cut. This pre-planning step saves material and reduces frustration during assembly.
Material Selection and Color Theory
The visual impact of the Mermaid Treasure Bag depends heavily on your choice of materials. The recommended supply list suggests using Encore Cardstock 80 lb cover, a weight that provides enough rigidity to hold the bag's shape while remaining flexible enough for intricate folding. Using paper that is too thin will result in a saggy structure, while paper that is too thick may crack along the score lines.
To achieve the authentic "mermaid" aesthetic, color selection is paramount. The design calls for a vibrant palette that mimics the ocean's diversity. Here is a breakdown of how these colors function within the design:
- Rosy Cheeks Cardstock: Used for the primary body layers, providing a warm, coral-like base that contrasts beautifully with cooler tones.
- Capri Cove and Teal Glitter: These shades introduce the aquatic element. The teal glitter, in particular, adds a shimmering effect that catches the light, simulating the reflection of sun on water.
- Dark Red and Vermillion: These deeper tones add dimension and shadow, preventing the bag from looking flat. They are often used for inner layers or accent details.
- Jet Black and Wild Orchid: Used sparingly for definition and contrast, helping the brighter colors pop.
- Pattern Paper: A sheet of pink pattern paper can be used for interior lining or specific decorative overlays to break up solid blocks of color.
For those looking to source these specific hues, shops like the 12×12 Cardstock Shop offer curated bundles such as the "Blue Diamond Couture" or "All American Red" packs. Investing in high-quality, color-fast cardstock ensures that your treasure bags remain vibrant over time, making them suitable for keepsakes rather than just disposable party favors.
The Assembly Process: From Flat to Form
Assembly is where the Mermaid Treasure Bag SVG truly shines, but it requires patience and the right tools. The process is not difficult, but it is detailed. A step-by-step video tutorial is typically included with the download, which is invaluable for visual learners. However, understanding the general workflow helps prepare you for the task.
- Cutting and Scoring: Load your cardstock into the machine according to the PDF legend. Ensure your blade is sharp; dull blades can tear glitter cardstock. After cutting, do not remove the pieces from the mat immediately if they are delicate. Use a weeding tool to lift excess paper carefully.
- Folding: Follow the score lines precisely. Use a bone folder to create crisp edges. The curved sections of the bag require gentle manipulation to avoid creasing the paper unintentionally.
- Layering: Begin assembling the base layers using glue. Liquid glue or a strong double-sided tape works best here. Apply adhesive sparingly to avoid warping the paper.
- Adding Dimension: This is the secret weapon of professional papercrafters. Use foam squares to mount certain decorative elements. By raising the top layers slightly off the base, you create shadows and depth, enhancing the 3D illusion of the treasure bag.
- Embellishment: Once the structure is complete, add the finishing touches. Rhinestones and pearls are essential for this theme. Place them strategically around the "opening" of the bag or along the curves to mimic scattered gems. A ribbon, approximately 1/4” in thickness, can be threaded through designated slots to create a functional drawstring closure.
Practical Applications and Modern Workflows
Why choose this specific design over a generic gift bag? The answer lies in customization and perceived value. In modern crafting workflows, especially for small business owners or event planners, handmade items carry a premium. A Mermaid Treasure Bag is not just a container; it is part of the gift experience.
Consider a beach-themed wedding. Instead of standard tulle bags for confetti or candy, these treasure bags can hold personalized notes, small shells, or jewelry. The effort put into assembling them signals care and attention to detail. Similarly, for children’s parties, these bags can serve as the activity itself. Older children can assist in the gluing and embellishing process, turning craft time into a memorable party event.
From a production standpoint, the SVG format allows for scalability. While the default dimensions are 8.25” H x 6” W x 3” D, advanced users can resize the file in their design software to create mini versions for jewelry or larger versions for bulkier gifts. However, keep in mind that resizing may require adjusting the thickness of the cardstock to maintain structural integrity.
Tips for Success and Common Pitfalls
Even with a well-designed SVG, mistakes can happen. One common issue is misalignment during the gluing phase. To mitigate this, dry-fit all pieces before applying any adhesive. Lay out the layers exactly as they should appear, checking for symmetry and fit. Only once you are satisfied with the arrangement should you begin bonding the pieces.
Another consideration is the use of glitter cardstock. While visually stunning, glitter can shed and interfere with adhesive bonds. Wipe down the back of glitter sheets with a dry cloth before cutting to reduce loose particles. When gluing, press firmly and hold for a few seconds longer than you would with matte paper to ensure a secure bond.
Finally, don’t underestimate the power of ink. Distress inks or edge darkening can add an aged, antique look to the bag, enhancing the "treasure" vibe. A light touch of gold or bronze ink along the edges of the cutouts can simulate wear and tear, making the bag look like it was pulled from a sunken ship rather than a craft store.
The Mermaid Treasure Bag SVG represents a perfect blend of technical precision and artistic expression. It challenges crafters to think in three dimensions while offering the satisfaction of creating something tangible and beautiful. With the right materials, a bit of patience, and a keen eye for detail, this project can become a staple in your crafting repertoire, bringing a touch of oceanic enchantment to any occasion.