Mastering the Pumpkin Treat Box SVG for Flawless Autumn Crafts
There is a distinct joy in handing someone a handmade gift, especially when it captures the essence of the season. The Pumpkin Treat Box SVG offers a charming way to elevate your autumn celebrations, transforming simple cardstock into a three-dimensional keepsake. Whether you are preparing Halloween trick-or-treat bags, Thanksgiving table favors, or gifts for an autumn-themed party, this design provides a professional finish that flat envelopes simply cannot match. However, achieving that crisp, store-bought look requires more than just hitting "cut" on your machine. Many crafters encounter avoidable hurdles during assembly or material selection, leading to frustration rather than festivity.
This guide explores the practical nuances of working with this specific 3D paper craft. By understanding common pitfalls and adopting a strategic approach to your workflow, you can ensure every box folds perfectly and stands sturdy. We will cover everything from machine compatibility to the subtle art of color selection, helping you create treats that are as delightful to give as they are to receive.
Understanding Machine Compatibility and Mat Constraints
One of the most frequent misunderstandings among beginners involves the physical limitations of their cutting machines. This Pumpkin Treat Box SVG is explicitly designed with 12″×12″ cutting mats in mind. While it is technically possible to resize the design for smaller machines, such as those with 6″×12″ or 8.5″×11″ cutting areas, doing so introduces significant complexity. Users with smaller mats often attempt to slice the design manually within their software, which can lead to misaligned pieces or lost structural integrity if not done with precision.
If you are using a Cricut, Silhouette Cameo, ScanNCut, or any other SVG-ready cutter, always verify your mat size before loading the file. For those with standard 12″×12″ machines, the process is seamless. The design includes a clear assembly tutorial, but starting with the correct hardware setup prevents half the potential issues. If you must use a smaller machine, be prepared to spend extra time arranging pieces across multiple cuts and ensuring that registration marks or alignment guides are used effectively. Ignoring this step often results in boxes that do not close properly or have visible gaps in the pumpkin’s segments.
The Critical Role of Material Selection
A beautiful design can be ruined by poor material choices. A common mistake is using cardstock that is either too thin or too thick for the intricate folds required by a 3D structure. The recommended supply list specifies Encore Cardstock 80 lb cover (216 gsm). This weight is ideal because it holds its shape without cracking at the score lines. Using standard printer paper or lightweight scrapbook paper will result in a flimsy box that collapses under the weight of candies. Conversely, using heavy chipboard may prevent the small tabs from folding cleanly, causing the glue to fail.
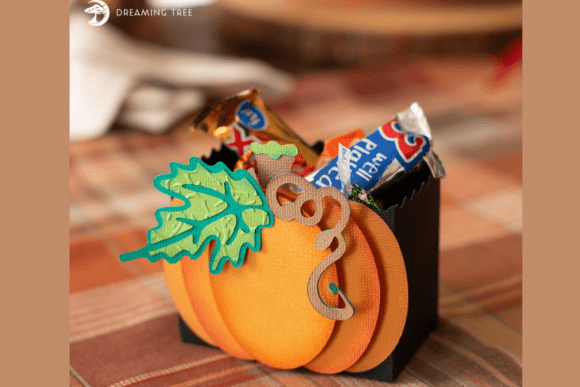
Color selection is equally vital for visual impact. The suggested palette includes Black, Caramel, Cricket (a soft green), Jade, and Tangerine cardstock. These colors mimic the natural gradients of a real pumpkin and provide high contrast for the stem and leaves. Beginners often overlook the importance of contrast, choosing monochromatic schemes that make the 3D details disappear. To avoid this, use the included PDF legend to map out your colors before cutting. This simple planning step ensures that the embossing and layering effects are visible, giving your project depth and professionalism.
Avoiding Assembly Errors for a Polished Finish
Even with perfect cuts, assembly can go awry if rushed. The Pumpkin Treat Box SVG relies on precise folding and adhesion. A frequent error is applying too much glue, which causes the paper to warp or the glue to seep out onto visible surfaces. Instead, use foam squares for the main structural connections where dimension is needed, and a fine-tip glue applicator for the smaller tabs. Foam squares add stability and lift, making the box feel substantial in the hand.
Another overlooked detail is the use of an embossing folder and crackle ink. While optional, these tools add texture that mimics the skin of a pumpkin. Skipping this step is not a mistake per se, but failing to plan for it if you do want it can be problematic. Embossing must be done before assembly. Trying to emboss a partially glued box will crush the structure and ruin the piece. Always complete all texturing, inking, and scoring steps while the pieces are still flat. This workflow ensures clean lines and consistent texture across all segments.
Leveraging Tutorials and Digital Resources
Digital downloads often come with resources that users ignore until they are stuck. This package includes a step-by-step video tutorial and a PDF legend. Many crafters attempt to assemble the box solely by looking at the cut files, assuming the shapes are self-explanatory. This leads to confusion regarding which tab connects to which slot, especially in the curved sections of the pumpkin. Watching the video tutorial first provides a mental map of the assembly order, reducing trial and error.
The PDF legend is particularly useful for identifying pieces when you have multiple colors loaded. It helps you quickly distinguish between the base, the lid, and the decorative elements. Keeping this legend open on a tablet or printed beside your workspace streamlines the process. It acts as a checklist, ensuring no piece is missed or misplaced. This organizational habit is crucial for efficiency, especially if you are producing these boxes in bulk for a business or large event.
Making Informed Decisions Before You Cut
Before purchasing or downloading any SVG, consider the end use. Are these boxes for heavy chocolates or light candies? The 3″ H x 3.5″ W x 2″ D dimensions are compact, making them perfect for small favors but potentially too small for larger items. Measure your intended contents first. If you need a larger box, check if the designer offers a scaled version or if your machine can handle the resized vector without losing detail quality.
Additionally, verify the file format. This design is provided in SVG format only. Ensure your software can import SVGs directly. While most modern cutting machines support this, older software versions may require conversion, which can sometimes distort curves. Testing the import process with a free sample before committing to a large project can save significant time.
Finally, consider the cost-effectiveness of your materials. Since this project uses specific cardstock weights, buying full sheets might seem expensive for a single box. However, the 8.5×11 sheet size allows for multiple boxes per sheet if arranged efficiently. Plan your layout to minimize waste. This approach not only reduces cost per unit but also aligns with sustainable crafting practices.
By paying attention to these details—machine compatibility, material weight, assembly sequence, and resource utilization—you transform a simple digital file into a high-quality physical product. The Pumpkin Treat Box SVG is a versatile tool for autumn creativity, but its success depends on the crafter’s preparation. Take the time to read the instructions, gather the right supplies, and follow the recommended workflow. The result will be a festive, durable, and beautifully crafted treat box that enhances your seasonal celebrations and impresses your recipients.